
A robust and reliable Power App is crucial for businesses and end-users in today’s increasingly mobile and digital world. While most users have access to fast and reliable internet connections, there are still times when connectivity may be limited or unavailable. Modern apps must function well to ensure a seamless user experience, even offline. Offline capabilities enhance usability and make your app more versatile and resilient, allowing users to continue working without disruptions.
Overview of Power Apps as a low-code platform
Power Apps is a Microsoft service that allows you to create custom applications quickly and easily without extensive coding knowledge. It is a low-code platform designed to empower users to create and share apps that connect to various data sources, such as SharePoint, Excel, and other custom APIs. With its intuitive drag-and-drop interface, Power Apps enables users to develop and deploy fully-featured applications tailored to specific business needs, making it an ideal solution for organizations of all sizes.
Purpose of this blog post: creating offline-ready Power Apps
This article aims to provide you with a definitive guide on how to make Power Apps work offline. We will explore the platform’s offline capabilities, discuss best practices for designing and implementing offline functionality, and provide a step-by-step guide to setting up your Power App for offline use. By the end of this guide, you will be well-equipped to create Power Apps that deliver a seamless user experience, whether your users are connected to the internet or working offline.
1. Understanding Power Apps Offline Capabilities
A. Offline data access and management
Power Apps provides built-in offline capabilities, allowing you to create apps that can access and manage data even when users are not connected to the internet. This is achieved through local data caching, where the app stores data on the device and allows users to interact with it. When the app reconnects to the internet, it can synchronize the local data with the remote data source, ensuring that all information is up-to-date.
B. Limitations and best practices
While Power Apps enables offline functionality, there are some limitations and best practices to consider. Not all data sources support offline access, and certain features, such as live data feeds and real-time collaboration, may not be available when working offline. To provide an optimal user experience, planning and designing your app with these constraints in mind is essential.
Some best practices for offline Power Apps include:
- Minimizing data transfer and storage requirements by caching only the necessary data.
- Implementing proper error handling and conflict resolution strategies during data synchronization.
- Providing clear indications of the app’s online and offline status to the end-user.
C. Power Apps components supporting offline functionality
Power Apps offers several components that can help you implement offline functionality in your app. Some of these components include:
- LoadData() and SaveData() : These functions enable you to cache data on the device for offline access. You can use LoadData to retrieve cached data when the app is offline and SaveData to store data locally when the app goes offline.
- Connection object: This object allows you to check the app’s connectivity status, helping you determine when to switch between online and offline modes.
- Refresh and Save functions: These functions can synchronize local data with the remote data source when the app reconnects to the internet.
By leveraging these components, you can create Power Apps that offer a seamless offline experience for your users.
2. Setting Up Your Power App for Offline Use
A. Creating a new app or modifying an existing app
Before implementing offline functionality, decide whether to create a new Power App or modify an existing one. Both approaches have advantages and challenges, so choose the one that best suits your requirements and resources. Remember that adding offline functionality to an existing app may require significant changes in the app’s structure and data management.
B. Enabling offline data caching with LoadData and SaveData functions
Once you’ve chosen to create a new app or modify an existing one, you’ll need to enable offline data caching using the LoadData and SaveData functions. These functions allow you to store and retrieve data on the device, making it accessible even when the user is offline.
- Identify the data you want to cache for offline access. Focus on essential data that users will need when working offline.
- Use the SaveData function to store data locally on the device when the app detects a disconnection from the internet.
- Use the LoadData function to retrieve the locally stored data when the app is launched, or the user is offline.
- Ensure that your app updates the local data cache whenever new data is added or modified, to keep the offline data accurate and up-to-date.
C. Implementing network connectivity checks
To provide a seamless transition between online and offline modes, your app should be able to detect changes in network connectivity. This can be achieved using the Connection object in Power Apps.
- Use the Connection.Connected property to determine the app’s connectivity status. This property returns a Boolean value indicating whether the app is connected to the internet.
- Create a function or event that triggers when the Connection.Connected property changes. This will allow your app to switch between online and offline modes automatically.
- Implement logic that handles data loading and saving based on the app’s connectivity status. When the app is online, it should fetch data from the remote data source, and when it’s offline, it should load data from the local cache.
By implementing these steps, you’ll set up your Power App to work efficiently in both online and offline scenarios, providing a smooth user experience.
3. Designing the Offline User Experience
A. Using offline-friendly controls and components
To provide a seamless offline experience, it’s essential to use controls and components that support offline functionality. When designing your app, consider the following:
- Use controls that function well without an internet connection, such as text inputs, buttons, sliders, and galleries.
- Avoid using components that rely heavily on real-time data or online services, such as live data feeds, interactive maps, AI Servies, or third-party APIs, unless you can cache their data for offline use.
- Implement fallback solutions for components that may not work correctly when offline, such as displaying a default image or message in place of a live data feed.
B. Displaying offline status indicators and messages
To keep users informed about the app’s connectivity status, displaying clear and visible offline status indicators and messages is crucial. These elements can help users understand the app’s current mode and manage offline expectations. Consider the following tips:
- Visual indicators, such as icons or banners, show the app’s online or offline status. Place these indicators in a prominent location within the app, so users can easily see them.
- Display informative messages to inform users when working offline and explain any limitations or restrictions they may encounter.
- Provide clear instructions on saving changes and sync data when the app reconnects to the internet, ensuring users understand the process.
C. Creating a seamless online-to-offline transition
A smooth transition between online and offline modes is essential for a positive user experience. To achieve this, consider the following strategies:
- Implement a consistent app design and layout for both online and offline modes. This will help users maintain familiarity with the app, even when working offline.
- Use animations or transitions to indicate changes in the app’s connectivity status, giving users a clear visual cue that the app is switching between modes.
- Design your app to automatically save user data and changes when it goes offline, ensuring users don’t lose their work.
By focusing on these aspects of the offline user experience, you can create a Power App that functions effectively and efficiently, regardless of the user’s internet connection.
4. Handling Data Synchronization
A. Synchronizing data between the app and the data source
When your Power App reconnects to the internet after being offline, it’s essential to synchronize the local data with the remote data source. This process ensures that any offline changes are updated in the data source, and any new data from the source is incorporated into the app. To achieve this:
- Use the Refresh function to update the app’s data from the remote data source when the app reconnects to the internet.
- Implement a Save function to submit any offline changes to the data source.
- After synchronisation, update the local data cache with the latest data source data, ensuring the offline data remains accurate and up-to-date.
B. Conflict resolution strategies and best practices
Data synchronization can sometimes lead to conflicts, such as when two users modify the same data simultaneously. To handle these situations, implement conflict resolution strategies that ensure data integrity and maintain a smooth user experience.
Some conflict resolution strategies include:
- Last-write wins: Update the data source with the most recent change, discarding any earlier changes.
- Merge changes: Combine the conflicting changes, preserving both sets of modifications when possible.
- User intervention: Notify the user of the conflict and allow them to decide how to resolve it.
When implementing conflict resolution, consider the following best practices:
- Track the timestamp of changes made to the data to help determine the most recent update.
- Provide clear and informative messages to users about any conflicts during synchronization.
- Log conflict details and resolution outcomes to help diagnose and address issues.
C. Dealing with errors and exceptions during sync
During data synchronization, errors and exceptions, such as network timeouts or data validation issues, may occur. To handle these situations effectively:
- Implement error handling and retry mechanisms to manage temporary issues like network timeouts or service unavailability.
- Validate data before submitting it to the data source, ensuring that it meets any required formatting or validation rules.
- Provide clear and informative error messages to users, explaining the issue and any steps they need to take to resolve it.
Implementing these data synchronization strategies ensures that your Power App maintains data integrity and provides a seamless user experience, even when transitioning between online and offline modes.
5. Testing Your Offline-Ready Power App
A. Emulating offline conditions for testing
Testing it under various offline conditions is crucial to ensure your Power App works effectively offline. Emulate different scenarios to identify any issues or limitations users may encounter when working offline.
- Use browser developer tools or network simulation software to emulate different offline scenarios, such as slow or intermittent connections, complete disconnections, and reconnections.
- Test your app on multiple devices and platforms to ensure it works correctly across various operating systems, screen sizes, and hardware configurations.
B. Ensuring data integrity and functionality during offline use
During testing, pay close attention to data integrity and app functionality in offline mode:
- Please verify that the app correctly caches data for offline use and retrieves it when it is offline.
- Ensure that all app controls and components function as expected offline and that the user experience remains consistent.
- Confirm that any offline changes are correctly synchronized with the remote data source when the app reconnects to the internet.
C. Gathering user feedback and refining the app
User feedback is invaluable for identifying issues and areas for improvement in your offline-ready Power App:
- Conduct usability tests with real users to gather feedback on the app’s offline functionality and user experience.
- Use surveys, interviews, or focus groups to collect detailed feedback about users’ experiences when working offline.
- Implement suggested improvements and refinements to the app based on user feedback, ensuring a seamless and satisfying offline experience.
By thoroughly testing and refining your Power App, you can create a reliable and efficient app that works seamlessly in both online and offline scenarios.
6. Optimizing Performance and Storage
A. Compressing and minimizing data for faster loading and saving
To improve your Power App’s performance offline, optimising the data you cache for offline use is essential. Compressing and minimizing data can help reduce loading and saving times, providing users a faster and more responsive experience.
- Minimize data by caching only the necessary data and removing redundant or irrelevant information.
B. Managing local storage and app data size
As devices have limited storage capacity, it’s crucial to manage your Power App’s local storage usage effectively:
- Monitor your app’s data storage usage to ensure it does not exceed device limits or impact device performance.
- Implement data retention policies to remove old or unnecessary data from the local cache, freeing up storage space.
- Provide users with the option to manage their local data, such as deleting or exporting data when needed.
C. Strategies for optimizing app performance
In addition to optimizing data storage, consider implementing other performance-enhancing strategies for your offline-ready Power App:
- Use efficient algorithms and data structures for processing and manipulating data in the app.
- Implement lazy loading or pagination techniques to load data on-demand, reducing the initial load time.
- Optimize the app’s UI and animations to minimize resource usage and ensure a smooth and responsive user experience.
By focusing on performance and storage optimization, you can create an offline-ready Power App that delivers a fast and efficient user experience, regardless of the device or connectivity conditions.
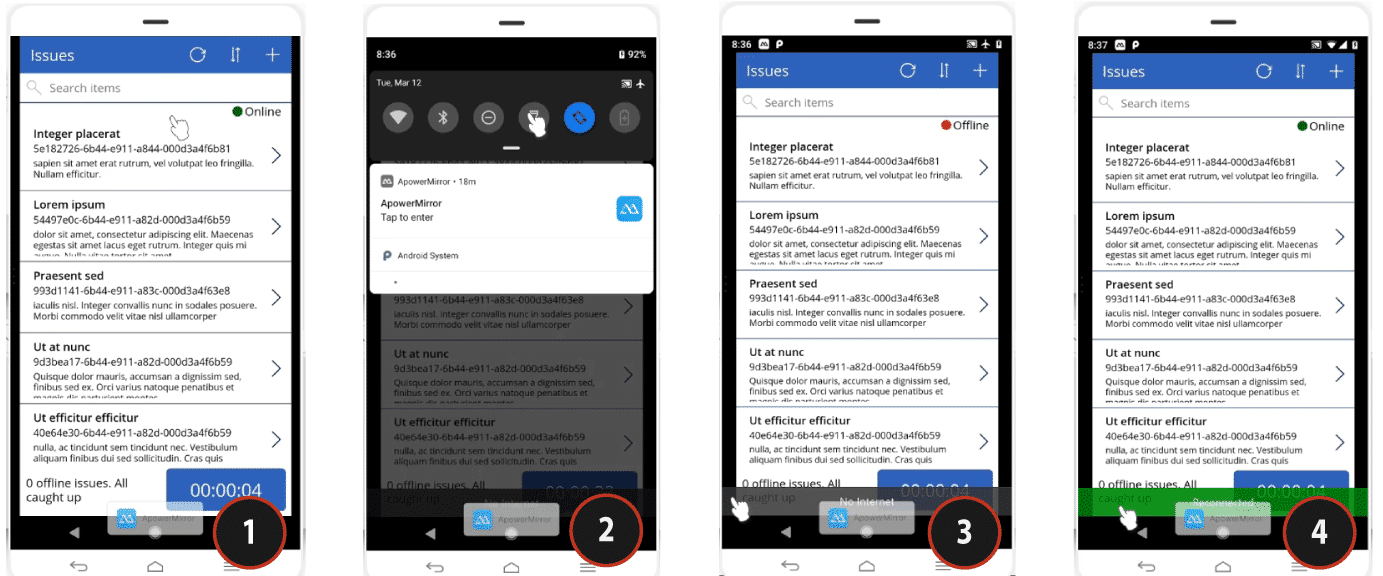
7. A working example of offline mode: The Issue Tracker App
Matt Schuessler presented this example at a Collab365 Summit. The screens below demonstrate the entry point and home screen to an Issue Tracker App.
TIP: If you ever need to demonstrate your PowerApp working Offline mode to an audience, you must mirror it to a projector monitor. I found that there are several apps out there that can easily mirror a phone, but if you then turn on “Airplane mode” (to demonstrate “going Offline”), then the mirroring will stop working. Not ideal. I am using PowerApps on Android and found a mirroring app that works via USB called ApowerMirror.
Moving back to the demo …
- Screen 1 – This is simply how to load the app from the PowerApps menu. I clicked “Issue Tracker”.
- Screen 2 – A loading screen opening my app (and typically where you’d load in your “On start” code).
- Screen 3 – The main screen has a “Simulate On Start” running the functionalities that would typically in the “In Start”. In our case, it pulls data from the data source and populates our galleries.
- Screen 4 – Once the On Start has been completed, the button is re-enabled.

Once we’ve retrieved all of the data we require for the Issues, we’re ready to show them:
- Screen 1 – This presents our Issues. Notice that there’s a green circle to denote the device is “online” (more on this shortly).
- Screen 2 – I am turning my phone to “Airplane mode” to make it offline.
- Screen 3 – You can now see that the green circle has changed to red and the text now says “Offline”. It’s also worth noting that natively, PowerApps will show a partially transparent black rectangle that says “No Internet”. You will need to tap that to make it disappear.
- Screen 4 – This shows what happens when I turn Airplane Mode back off. The native experience then shows a green rectangle to signify the phone is back online.
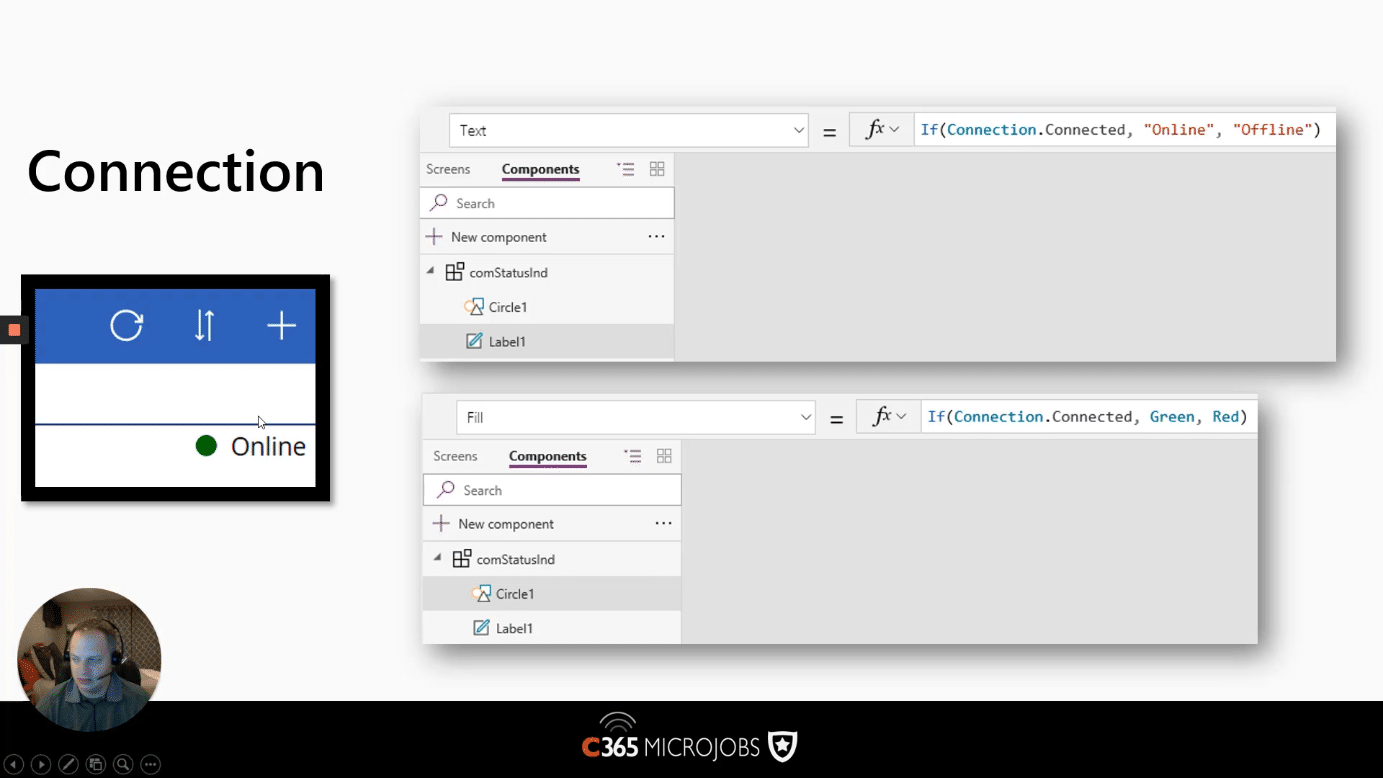
Using the “Connection” Signal
We’ve already touched on how you can query the Connection signal, but now we want to look at how we can build a small “component” with a circle and a label to show whether it’s offline or online (see next image).
Microsoft have implemented Power Apps components, allowing you to group controls into a reusable component. For this demo, let’s make a simple component to show the connectivity status (called ‘comStatusInd’). This means reusing it across screens is straightforward without recreating it every time.
How do we make the circle green or red based on the connection status?
To achieve this, drop a circle onto the canvas and set its color property to this function:
- -> If (Connection.Connected, Green, Red)
How do we change the text to show Offline or Online?
Drop a label onto the canvas and set its label property to a function of:
- -> If (Connection.Connected, “Online”, “Offline”).
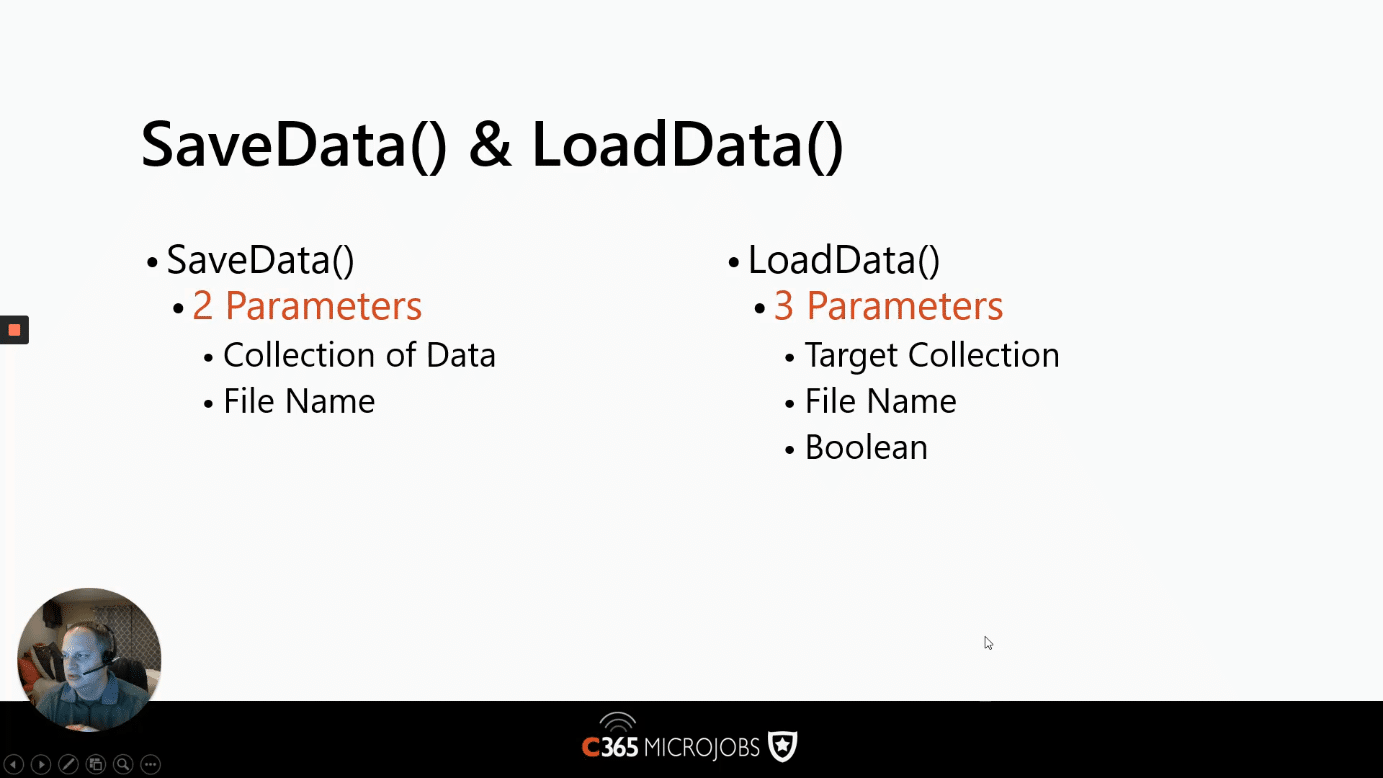
Using SaveData() and LoadData()
These two functions are essential, and you must have a good understanding of them. So let’s give a rundown of how to use them both.
SaveData()
This function is used to save data to the collection and takes two parameters:
- Collection of Data – the data you want to save in the Offline file.
- File Name – Name of the file to store against.
LoadData()
This function, as you’d imagine, is used to load data back out of the local collection and takes 3 parameters:
- Target Collection – the collection you want to load the data into.
- File Name – the file name containing the data.
- Boolean – True / False … if you can’t find the offline file do you want to load without an error. (normally you’d set this to “True”).
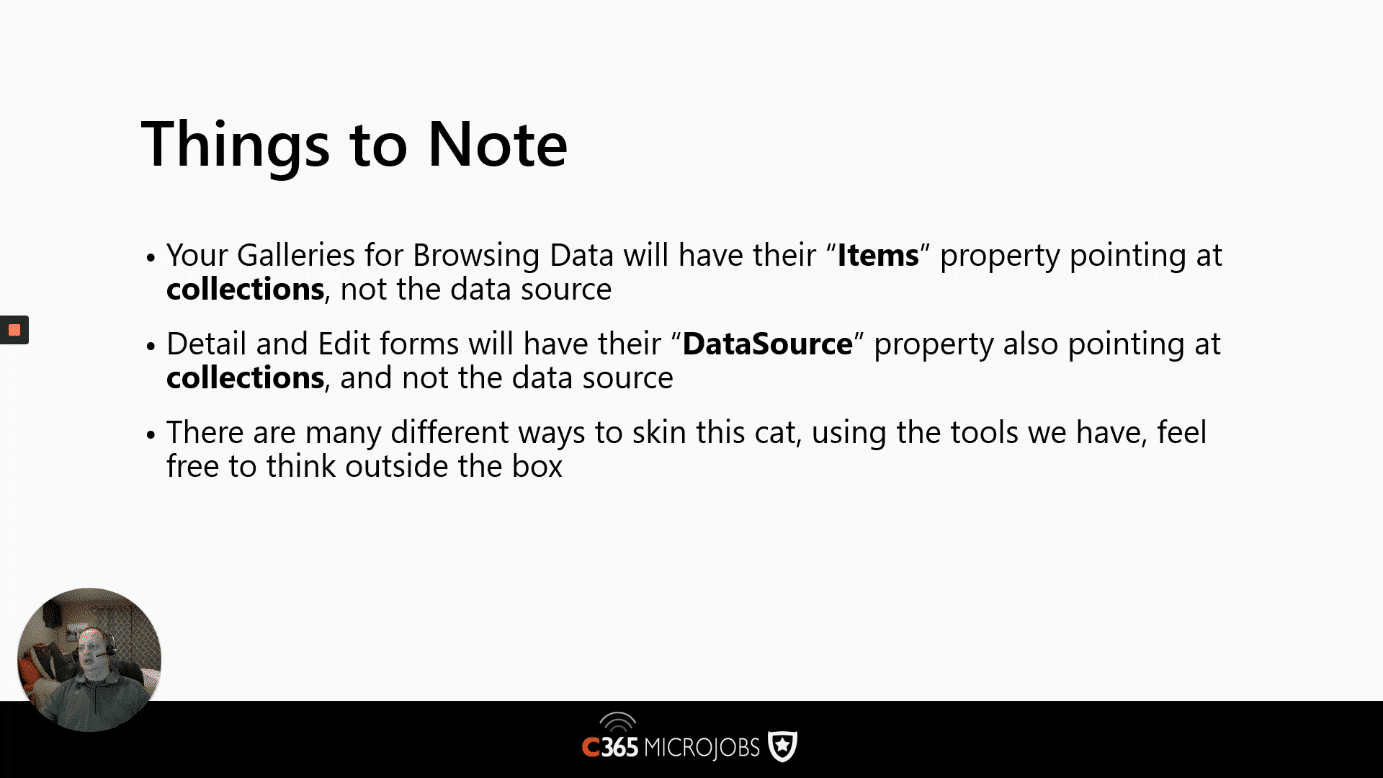
Other Points of Note
The primary point about the following slide is how you will bind your controls to their data. To support Offline mode, you must bind them to the local collection rather than the underlying data source. If we don’t do this, when you try to browse or edit the forms, your Power App will fail as soon as the connection goes. Pointing them to the collection allows the Power Apps to serve the user with its data still.
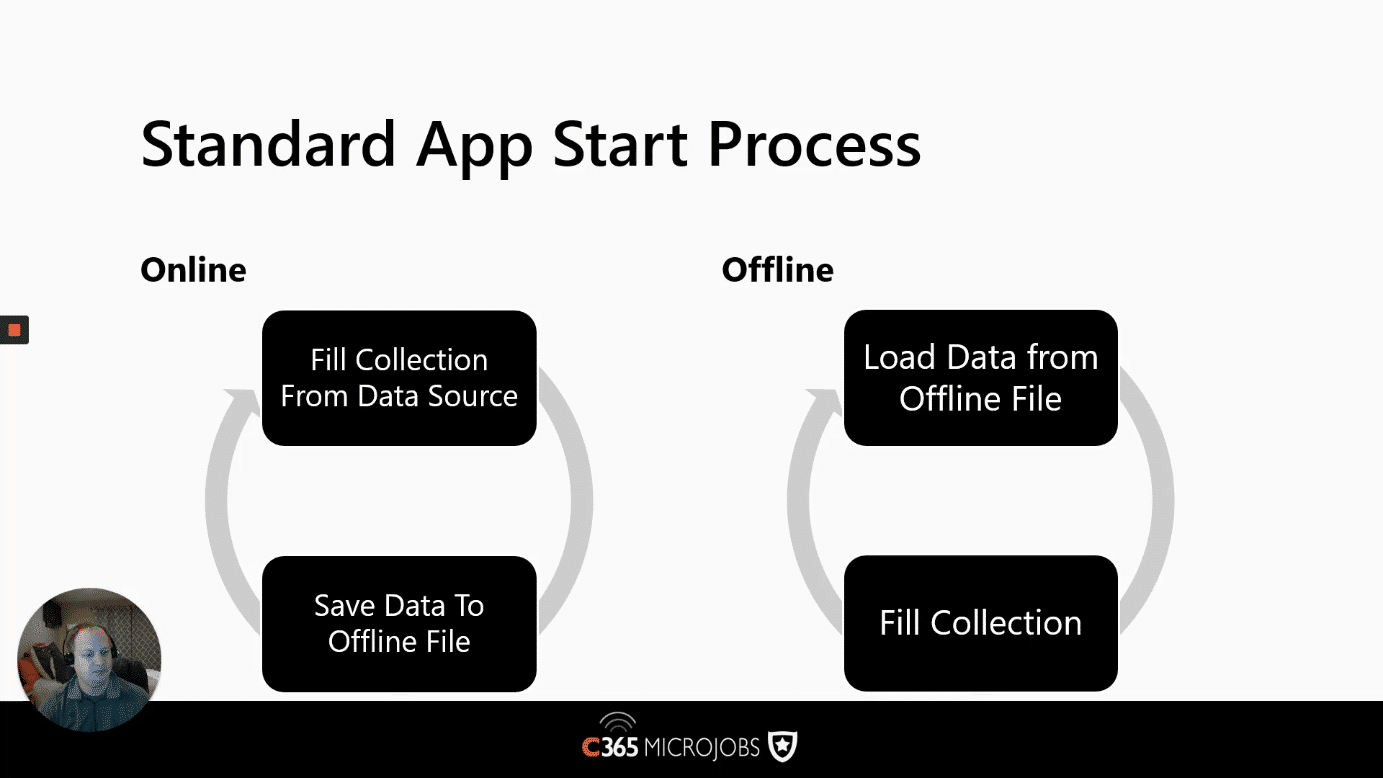
What will our standard App Start Process look like in an Offline enable PowerApp?
When your PowerApps loads, you will probably want to follow these steps:
If your PowerApps loads with an active connection …
- Get the data from your data source and load it into a collection.
- Save the Collection Data to an Offline file.
If your PowerApps loads with no active connection …
- Load the data from your local Offline file.
- Fill in the collection from that locally loaded data.
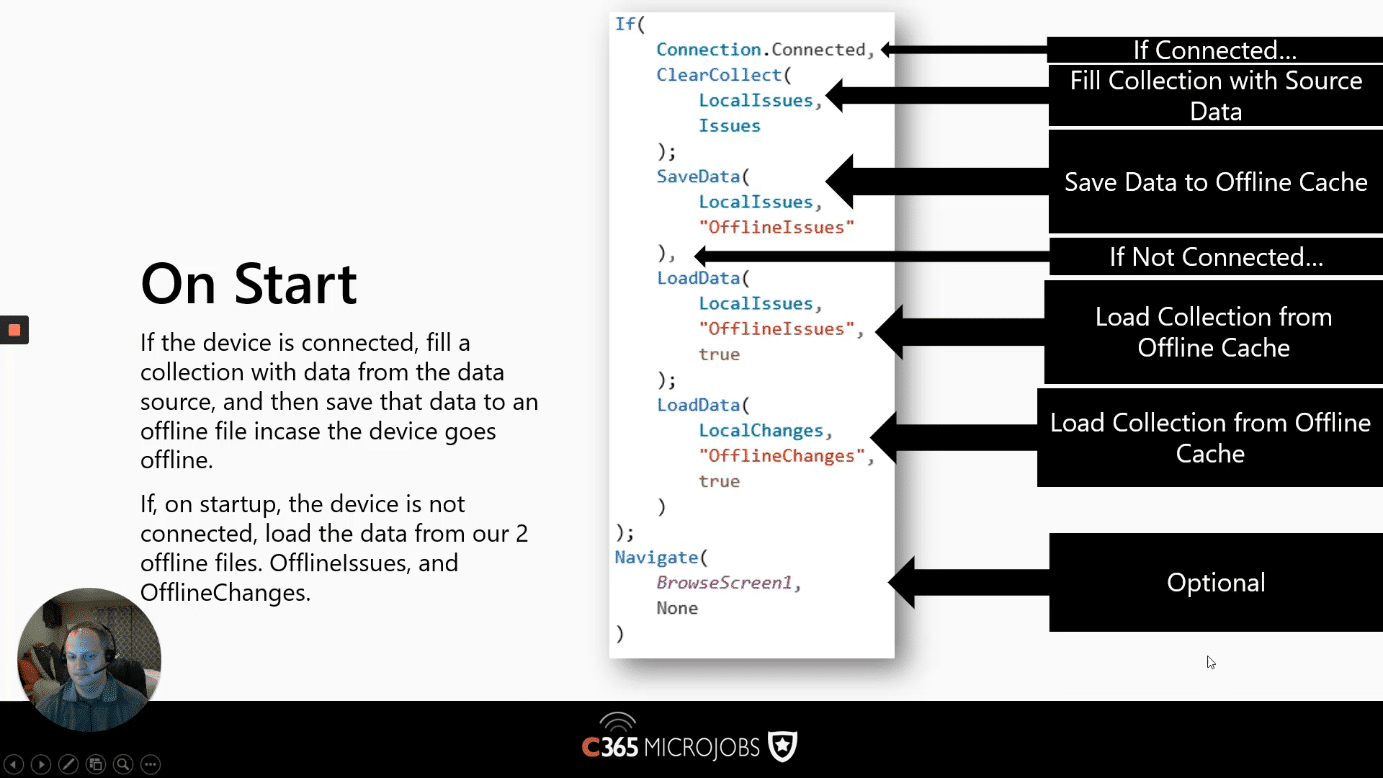
A Typical “On Start” examined
The following slide illustrates how you structure a code snippet to handle the On Start for an Offline-enabled Power App.
If there is a connection:
- Connected.Connected returns a boolean if the mobile device is connected or not.
- ClearCollect(LocalIssues, Issues) – The ClearCollect function will delete all the records in “LocalIssues” and then fill it with data from “Issues”).
- SaveData(LocalIssues, “OfflineIssues”) – This will save the data to a collection called “OfflineIssues”.
If there is no connection:
- LoadData(LocalIssues, “OfflineIssues”, true) – If we’re not connected (denoted by the comma), this reloads the collection with the name “OfflineIssues”. The “true” tells Power Apps to ignore any loading errors.
- LoadData(LocalChanges, “OfflineIssues”, true) – If we’re not connected, we’re also going to load another collection with the name “OfflineIssues”. The “true” tells PowerApps to ignore any loading errors. This will store all the changes made when offline.
In both Offline and Online cases, you then want to:
- Navigate(BrowseScreen1, None) – regardless of whether the device is offline or online, we will then navigate to a screen called “BrowseScreen1”, which will show the data.
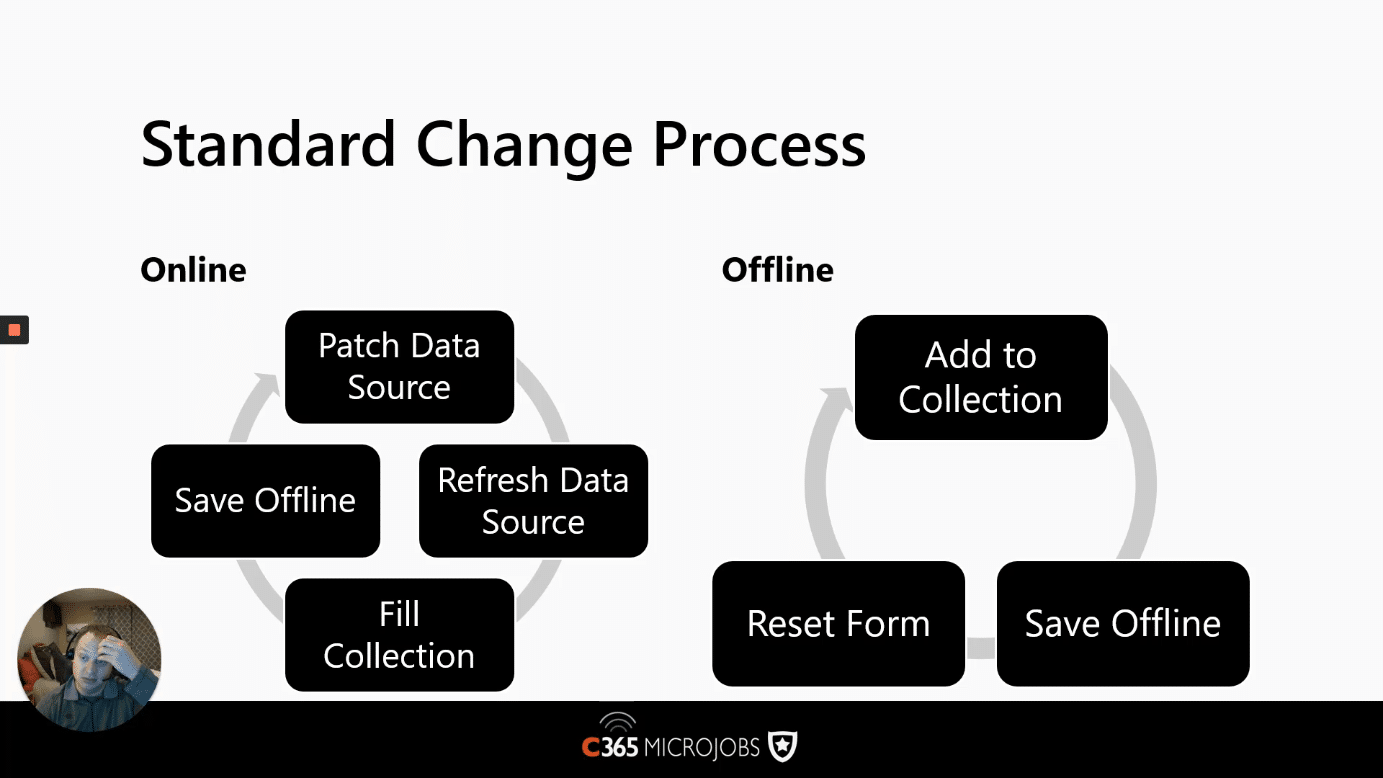
What happens when a change to the data happens?
When a change happens to the data, this is the process that we will need to follow for Online and Offline:
Online change management
If we’re online, we will patch the data source, refresh it, fill a collection with data and then save it offline.
Offline change management
If we’re Offline, when the data is changed, it’s saved in a collection that will track the changes. We then hold that collection Offline and then reset the form to reflect the change.
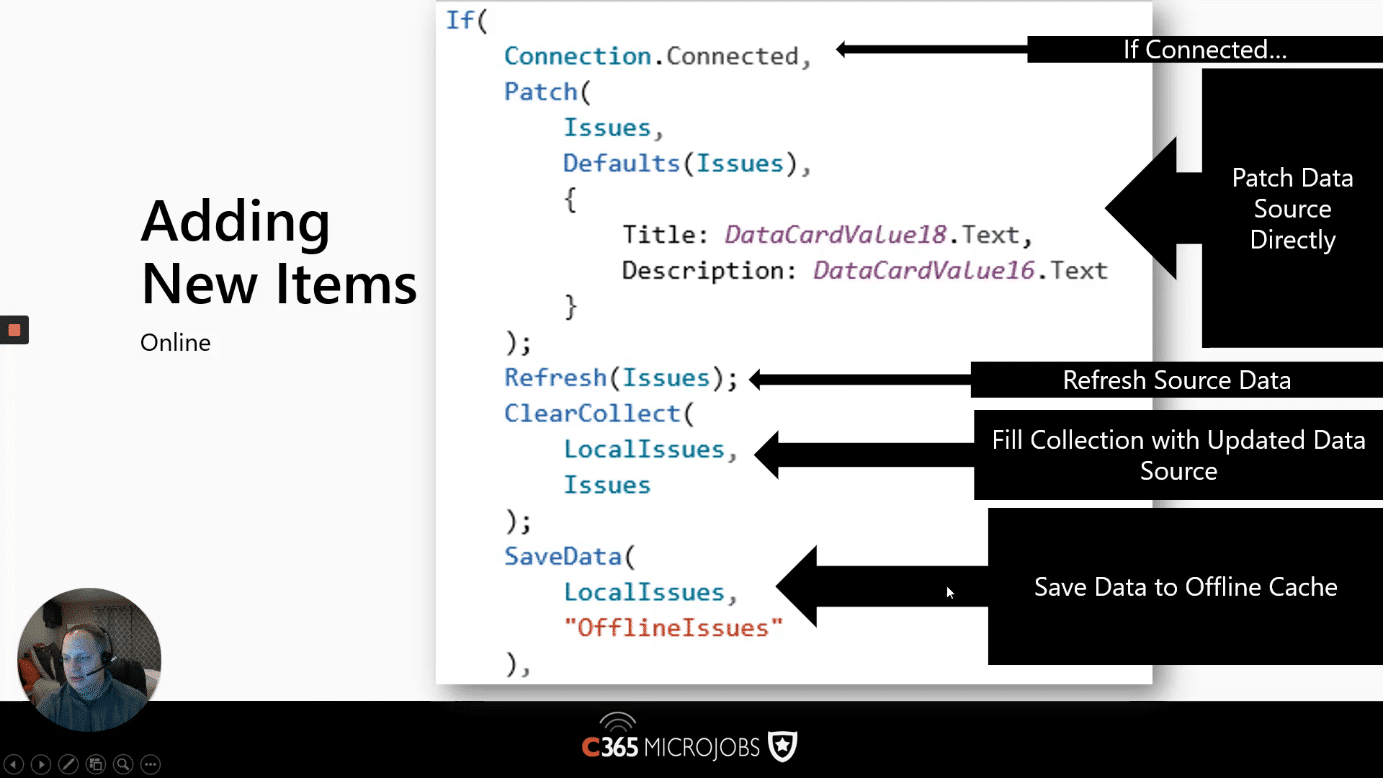
How to add new items when you are connected to the Internet.
If the device has a connection, then this is the flow illustrated in the following slide:
- If (Connected.Connected …) – this returns a boolean if the mobile device is connected or not.
- Patch(Issues, Defaults(Issues), { … } – As we are connected, we want to create a record in the “Issues” data source, using a default issue record and a change record supplied by values from the UI (as JSON).
- Refresh(Issues) – Now that we’ve patched the data, we need to refresh the records in the “Issues” data source.
- ClearCollect(LocalIssues, Issues) – Fill the collection with the updated data source.
- SaveData(LocalIssues, “OfflineIssues”) – This will save the data to a collection called “OfflineIssues”.
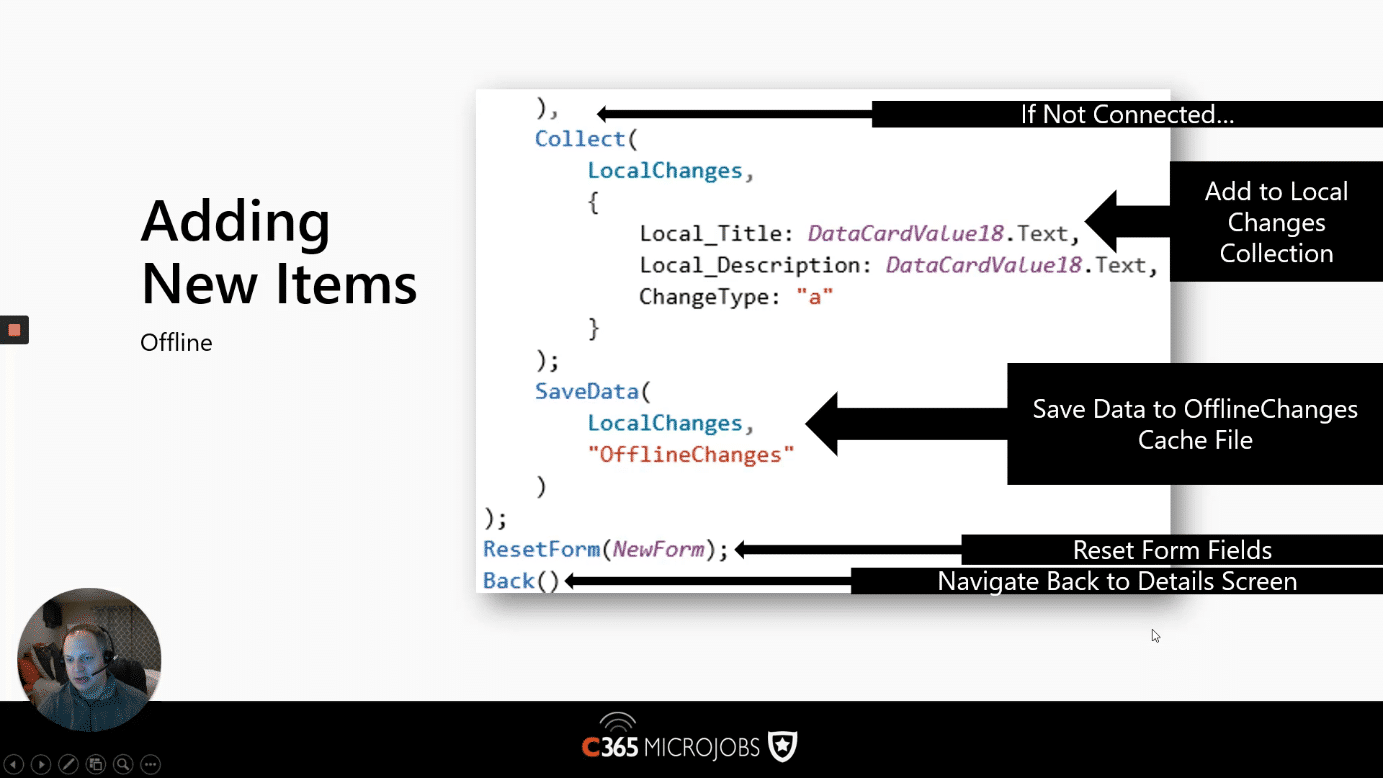
How to add new items when you are disconnected from the Internet
If the device has no connection to the Internet, then this is how you would code this up to save the records locally to the device (not the data source).
- If (Connected.Connected …) – does not show on the slide, let’s assume this returned “false”.
- Collect(LocalChanges, { … }) – Add the changes made in the UI to our local collection called “LocalChanges”. We used “ChangeType” to denote the type of change (e.g. “a” = add, “d” = delete, “e” = edit). This is used to sync your changes back up when reconnected.
- SaveData(LocalChanges, “OfflineChanges”) – This will save the data to a collection called “OfflineIssues”.
- ResetForm(NewForm) – Reset the form’s contents to its initial values.
- Back() – Display the previous screen.
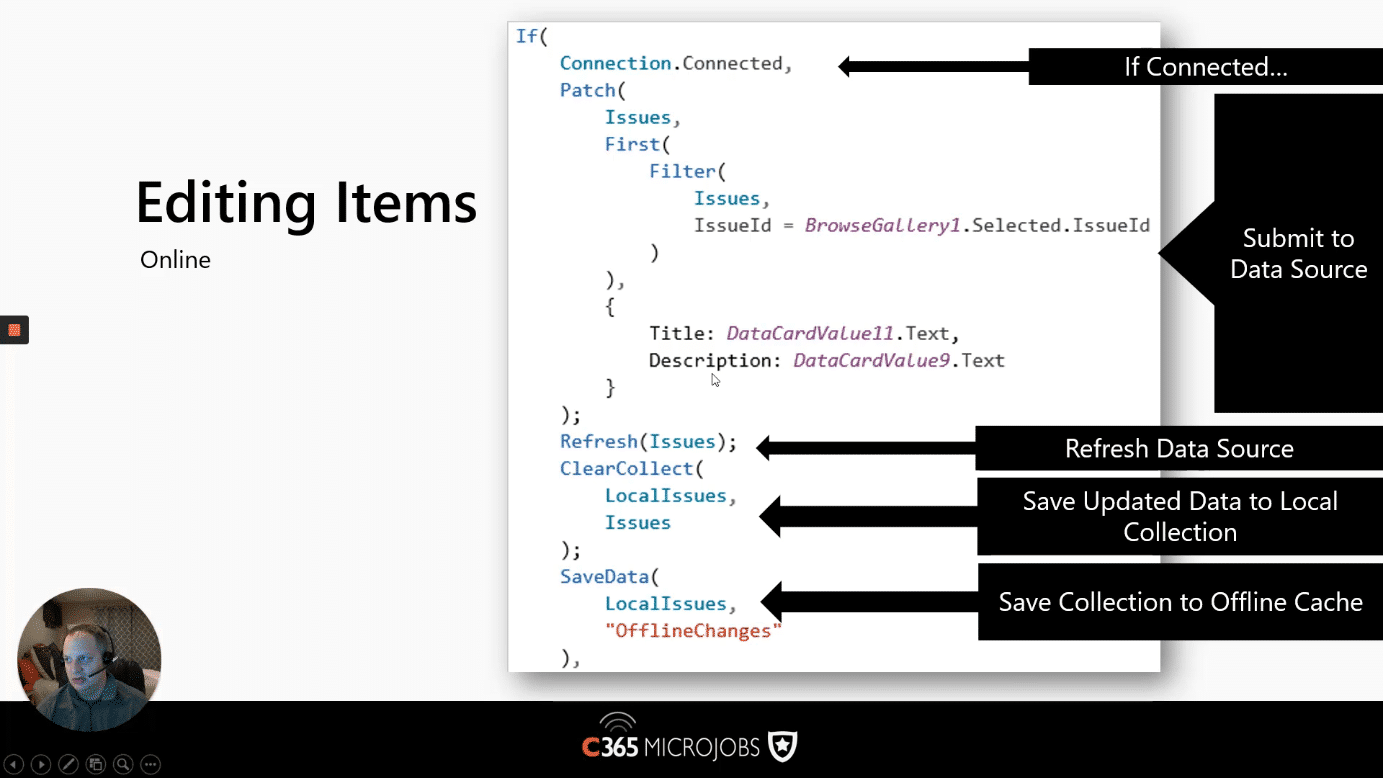
How to edit items when you are connected to the Internet
If the device has a connection, then this is the flow illustrated in the following slide:
- If (Connected.Connected …) – this returns a boolean if the mobile device is connected or not.
- Patch(Issues, First(Issues), { … } – As we are connected, we want to create a record in the “Issues” data source using the first Issue record (matching the IssueId) and a change record supplied by values from the UI (as JSON).
- Refresh(Issues) – Now that we’ve patched the data, we need to refresh the records in the “Issues” data source.
- ClearCollect(LocalIssues, Issues) – Fill the collection with the updated data source.
- SaveData(LocalIssues, “OfflineIssues”) – This will save the data to a collection called “OfflineIssues”.
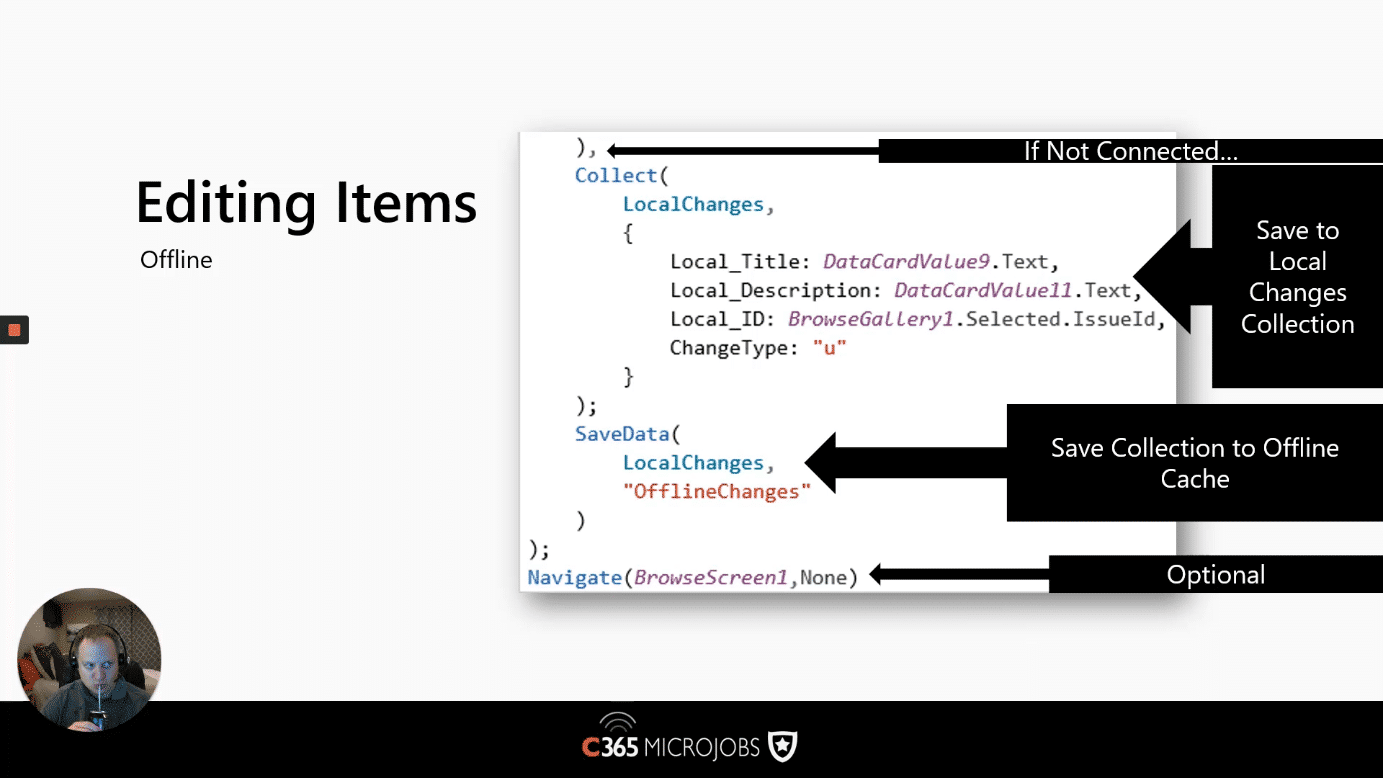
How to edit items when you are disconnected from the Internet
The slide below omits the If (Connection.Connected) purposes, but this is still how we test. If this returns “false” that this code will run and this is how we handle an item being edited.
- Collect(LocalChanges, { … }) – Add the changes made in the UI to our local collection called “LocalChanges”.
- SaveData(LocalIssues, “OfflineChanges”) – This will save the data to a collection called “OfflineChanges”.
- Navigate(BrowseScreen1, None) – regardless of whether the device is offline or online, we will then navigate to a screen called “BrowseScreen1”, which will show the data.
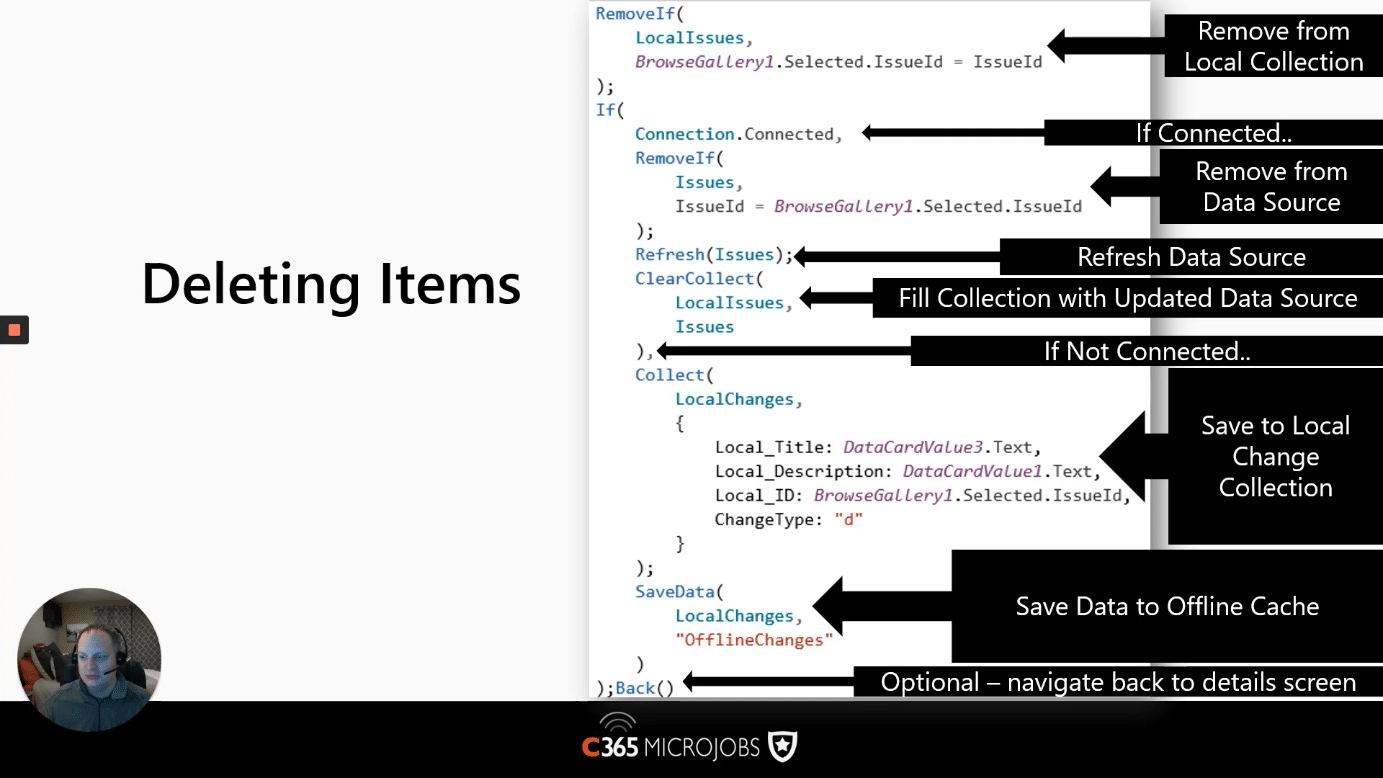
How to delete items in a connected and disconnected scenario
If we are connected:
- RemoveIf(Issues, IssueId = BrowseGallery1.Selected.IssueId) – Delete a record matching the selected Issue Id.
- Refresh(Issues) – Now that we’ve deleted the data record, we need to refresh the records in the “Issues” data source.
- ClearCollect(LocalIssues, Issues) – Fill the collection with the updated data source.
If we are disconnected:
As we can’t commit the deletions, we need to store them locally and flag them to be deleted when we sync back up online.
- Collect(LocalChanges, { …, ChangeType=”d” } – Save the record and flag if is it to be deleted with a “ChangeType = “d”).
- SaveData(LocalIssues, “OfflineChanges”) – This will save the data to a collection called “OfflineChanges”.
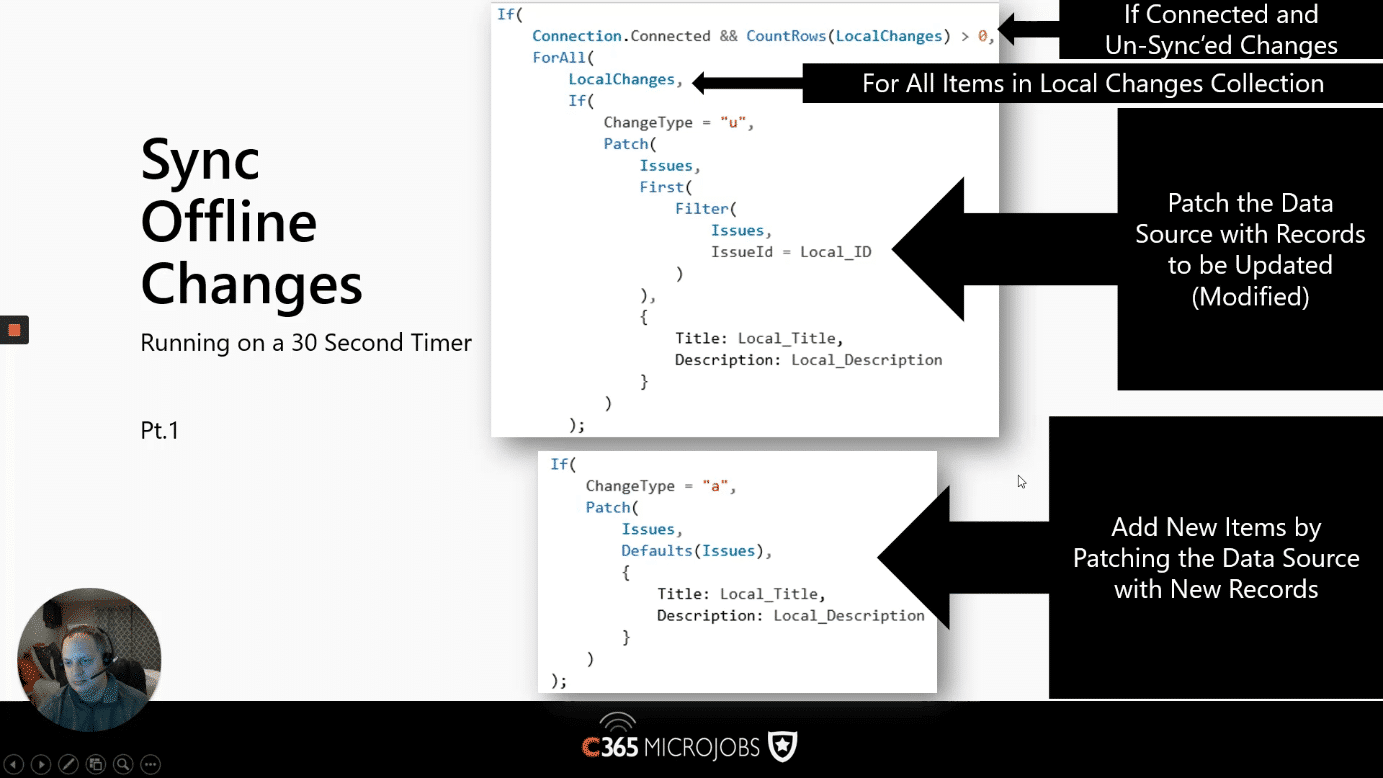
How to sync changes when your PowerApps is reconnected?
Now that we’ve discovered good ways to store our edits and deletes in a local connection on the device, we need to work out how to commit these changes when the phone is connected again. One elegant and straightforward way to achieve this is to use a Timer Control and have it checked every 30 seconds. The timer control will run (every 30 seconds), and if it’s connected will sync the changes back. The Slide below illustrates the process at a high level.
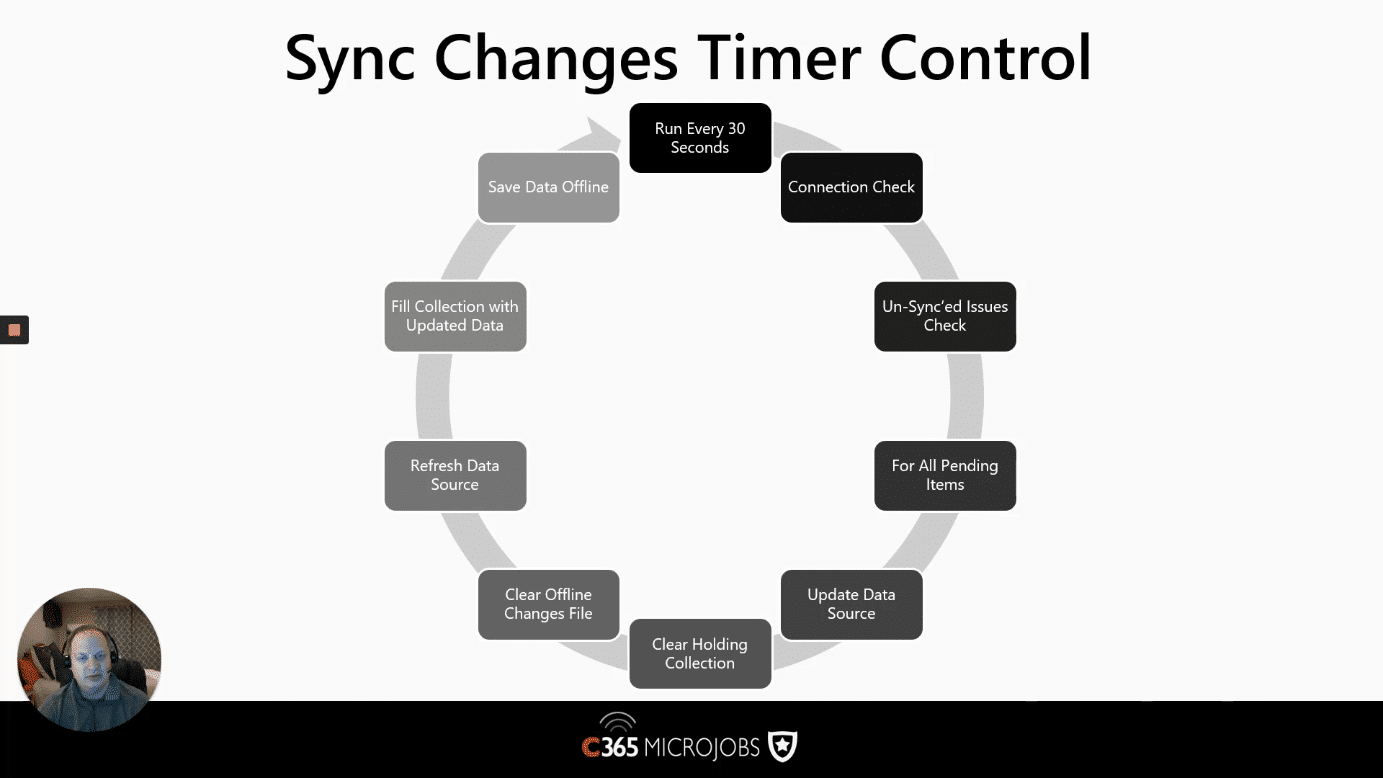
Steps to Sync Offline Changes
- If (Connection.Connected && CountRows(LocalChanges) > 0, … – If we are connecteed, and we have at least one record to sync back.
- ForAll(LocalChanges, – Iterate through every pending change in the “LocalChanges” collection.
- If (ChangeType = “u” – We only want to process updates (not deletes) at this stage.
- If (ChangeType = “a” – We only want to process new records.
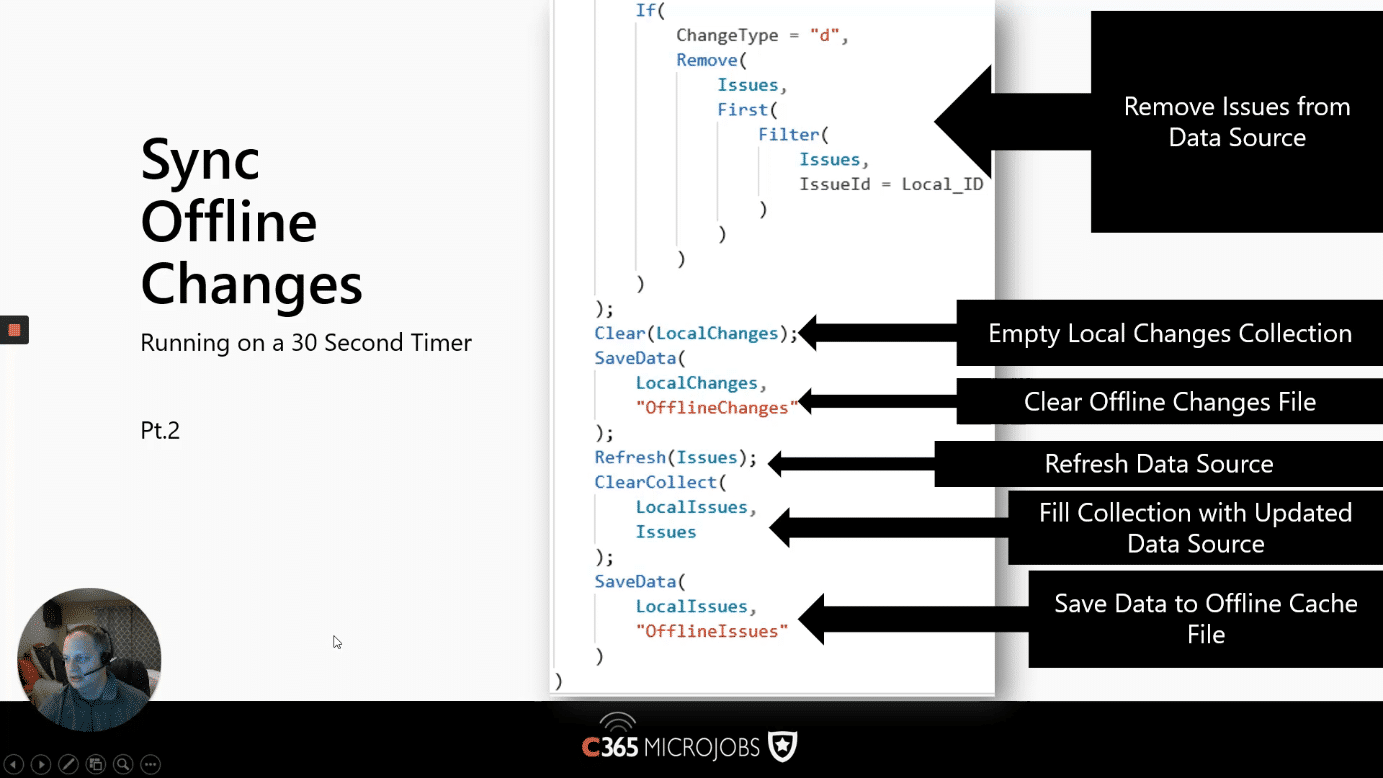
How to sync “deletes” back to the data source
- If (ChangeType = “d” – We only want to process deleted records.
- Remove(Issues, First(Filter(Issues, IssueId = Local_ID))) – Deletes the record matching the current Issue Id (in the loop).
- Clear(LocalChanges) – Empty out our local changes as we’ve not processed the records.
- SaveData(LocalChanges, “OfflineChanges”) – This will save (the cleared collection) to a file called “OfflineChanges”.
- Refresh(Issues) – Gets the latest data from the data source.
- ClearCollect(LocalIssues, Issues) – Fill the collection with the updated data source.
- SaveData(LocalIssues, “OfflineIssues”) – Save the new data to our offline collection.
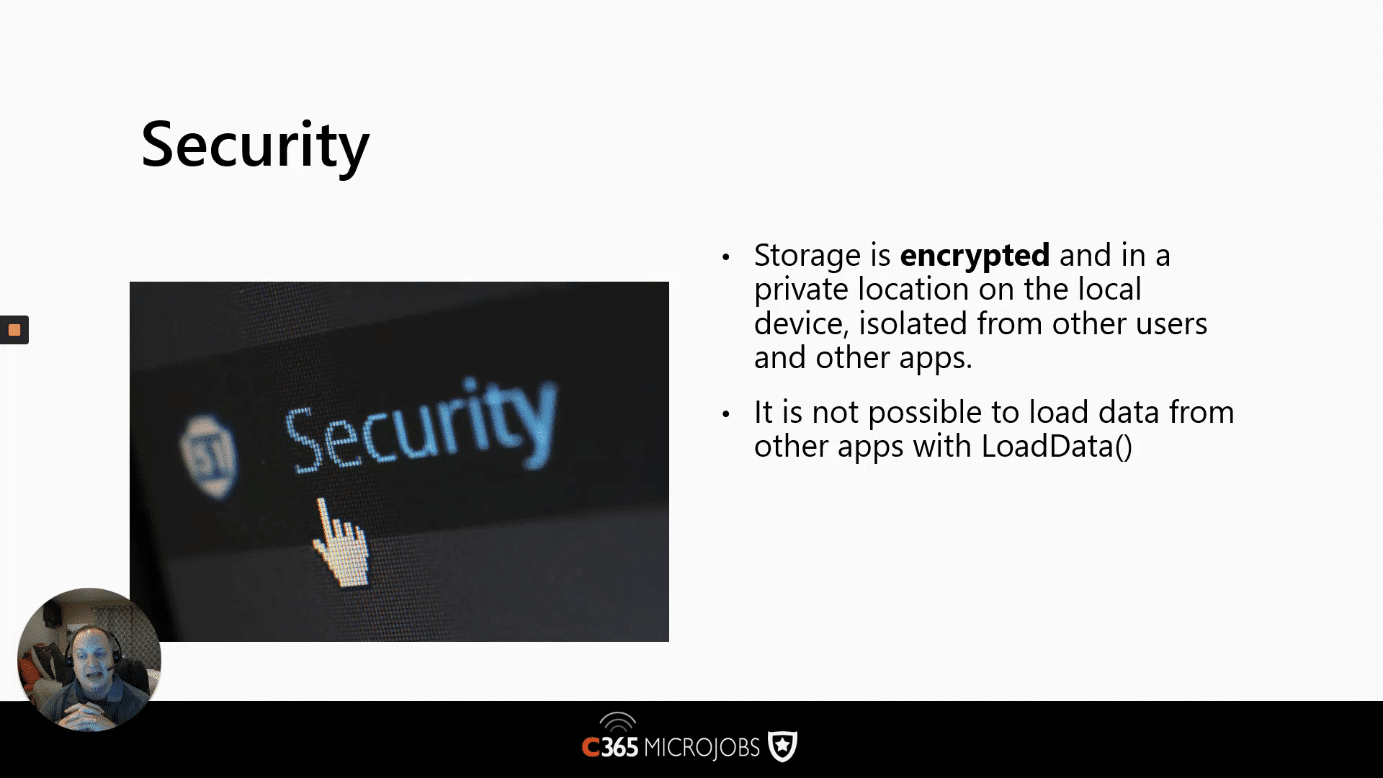
How to handle security?
As you will be storing data locally, you do not want that data to be accessible by other users/applications on your device. For this reason, the storage is encrypted, and it’s only possible to load data from the PowerApp that saved it. This means that PowerApps cannot share local data.
What are the limitations with PowerApps?
By this stage, hopefully, you have an excellent idea of how to deal with Offline features within PowerApps. In this section, I want to talk briefly about some of the limitations you should be aware of.
The first consideration is that the amount of memory limits you on the mobile device. You should be mindful that some mobile phones could be close to their memory limit, so storing 100 MB of data could result in an “out of space” issue.

Summary of Offline Support
To review what we’ve covered, let’s do a quick recap.
PowerApps offers built support for offline, using LoadData(), SaveData() and Connection.Connected.
Although this function is there to help, it’s still up to the developer to wire the application up, including building a UI that can work both Offline and Online. You may also want to consider synchronisation issues and conflict resolution where the data has changed while the user is Offline.
To Debug your application, you will need to work on a mobile device due to the limitations of the browser.
Microsoft is making improvements in this area, so watch out for up-and-coming updates.