Based on the widespread adoption of marketing automation and email marketing tools, it's safe to say that a significant number of businesses deal with high email volume and complexity.
Sending mass customized communications, ensuring proper oversight for sensitive emails and efficiently managing templates are a very common need. Automating any part of that process can save you a huge amount of effort. Learn how to achieve Inbox Zero with productivity workflows.
Here are just a few examples where businesses streamline the process:
- Handling Volume - Sending out a large number of similar emails regularly, such as newsletters, notifications, or reminders. Automating draft creation save time hand-writing each one. Instead, the tasks become review and tweaking before sending.
- Personalising at scale - Including personalized details in each email you send can be difficult. You can instead pull data from a system. Automation helps customize at scale while still allowing for review processes.
- Dealing with Sensitive communications - Providing oversight on particularly sensitive, confidential, or high-stakes communications before they are sent out. Automation can prepare drafts, then a person reviews and approves before sending.
- Pulling together data from different sources - Creating detailed, personalized emails with attachments or data from multiple sources is time consuming. Automation handles assembling the content, allowing a focus on high-value review and edits instead.
- Giving a centralised Audit trail - In regulated industries, having a review and approval audit trail can be important. Automation provides the drafts from common data sources and frees humans for oversight roles.
- Template management - Maintaining libraries of email templates and populating them with new data requires discipline. Automation handles templating and revisions.
The common thread in all of these is any situation where you need to send a high volume of emails, customize content, ensuring proper review of sensitive content before sending, or efficiently handle templates. In these cases, Power Automate can be a fantastic tool in your arsenal to provide help. It can perform the repetitive work while humans provide oversight.
In this blog, I’ll show you the process to set up for generating draft emails automatically using Power Automate; generate, but not send. You can decide what content forms the email (in this case using a List of data held in SharePoint) but with the skills you will learn, you really could assemble emails from multiple sources all at once - at scale - freeing you up to simply review and send.
Using the guide, you'll be able to take the position of the Power Automate assistant’s supervisor who inspects the results at your convenience before sending.
Doesn't Mail Merge Do This?
"Mail merge" is often used for cases where bulk mailings are required in organisations. You can use Excel and to help automate drafting the emails but here are a few reasons why using Power Automate goes that bit further and you will want to reach for this blog post:
- Power Automate can pull information from many different systems, not just Excel, so it's easy to get content from multiple places into your emails without lots of manual copying and pasting.
- Unlike basic mail merge, Power Automate lets you automate complex workflows, dynamically customize content, and even add approval steps like financial checks into email sequences.
- Power Automate goes beyond one-time mail merges - it can automatically start drafting emails based on schedules, form submissions, system events, and more to streamline the process.
- By integrating with Graph API, Power Automate unlocks extra functionality for email generation like advanced targeting options and the ability to save drafts to shared mailboxes for collaborative review - things a mail merge process can't do.
- Power Automate isn't just about merging data - you can embed sophisticated business logic like conditional branching, pulling data from multiple sources, and sequential review processes, making it far more versatile.
- Managing attachments is easy with Power Automate - you can include or exclude attachments selectively, even renaming or resaving them on the fly, offering a flexibility that old-school mail merge lacks.
The Power Automate flow I'm about to share provides a foundation for this versatility, customization and flexibility.
If you think it's something you may want to experiment with, let's get into how to set it up.
Set up your testing environment
In this example, we’re focussing on the process of bringing together all the ingredients of an email and putting them together in the right way to generate a draft. We won't focus fully on the reasons for doing this - as mentioned above, there are a wide variety of use cases where this may be what you are looking for.
As suggested above, the process will sit in a sweet spot for you if you regularly issue bulk communications to multiple email addresses and want a level of automation and control - beyond mail merge.
As Power Automate has so many connectors (options for you to bring your data into the automated process), there are any number of potential sources for these ingredients. To simply the process greatly, we’re going to start by putting all of them in a single SharePoint List.
Head over to the Site Contents page of a SharePoint site where you have permission to create lists and click New > List:

On the Create a list dialog that appears, click Blank list:

Give your list a suitable name, then click Create to create the new, blank list:

You now need to add all the columns that we might need to generate an email – one for each ingredient. To add the first, click + Add column then Multiple lines of text, then Next:

In the Create a column pane that opens up, name the column Recipients and in the additional options section at the bottom (you’ll need to expand this) click Require that this column contains information.
This is to ensure that every email has an email address to which it will be sent. Then click Next to create the column.
The reason we’ve chosen a Multiple lines of text type column is so that multiple email addresses can be inserted easily by adding an email address to each line of the value in this column. We’ll see an example of that below.


Now create another Multiple lines of text type column, this time called Message Body.
In the additional options, select Use enhanced rich text (Rich text with pictures, tables, and hyperlinks).
This is to allow the user to use formatted text in the body of their email. Then click Next to create the column.
That’s all the new columns we need to add, but there are two changes we need to make to the list before we start adding data.
First, click + Add column but this time select ⚙ Show or hide columns:

Check Attachments then click ✔ Apply
This will reveal the Attachments column that comes with the default (but hidden) list columns created with every SharePoint list.
Finally, we’re going to repurpose the existing Title column to use for our email subject line.
Select Title then Column settings then Rename and change the name to Subject


picture9
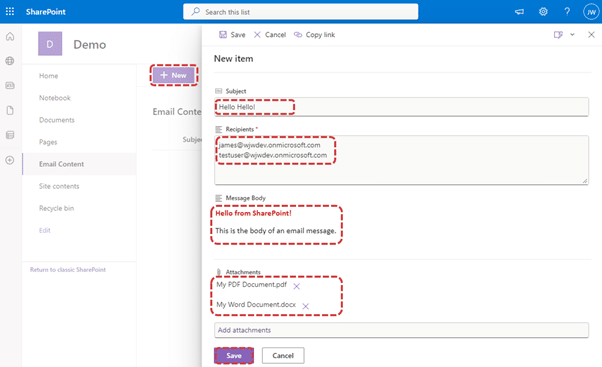
Now we’re ready to create our test data. Add one row, or a few rows, of data into the list using the + New button, then entering the data and clicking Save.
picture10
Remember to add multiple email addresses by using a new line for each one.
Building the flow – the easy way!
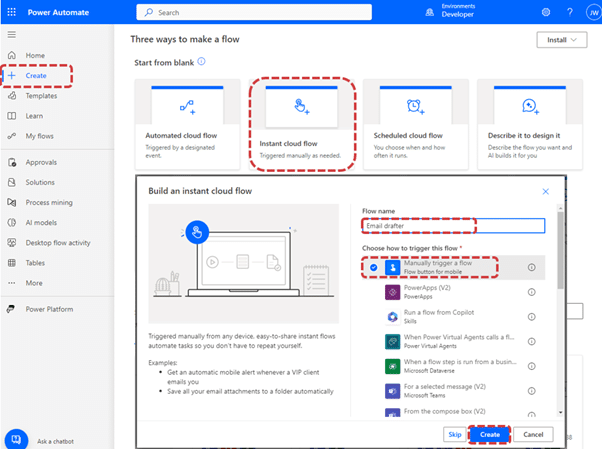
With our data accessible to Power Automate in a SharePoint Online list, it’s finally time to create our new flow! Head over to https://make.powerautomate.com and click + Create to start the process.
We’re using an Instant cloud flow in this example and selecting the Manually trigger a flow trigger. Feel free to experiment with different triggers, even automated cloud flow triggers, for example when an item is created in a list.
picture11
Give the flow a suitable Flow name then click Create:
The next thing you’ll see (at time of writing) is the new designer experience. As nice as this looks, we’re not going to use it just yet because there’s no way to paste in an action from outside the flow in the modern designer. Jon has recently produced a brief video guide on pasting into Power Automate, which you can watch here: https://www.youtube.com/watch?v=LNDdheElsXo
Pasting in actions will not only save you a lot of time (we’ve prepared some actions below we’re going to use to build this flow) but is actually critical for this build. This comes down to the fact that it is no longer possible to create a new Send an HTTP request (V1) action using the Office 365 Groups connector. The new V2 version of the action has a much narrower scope and will not accommodate the request we need to make to create a draft email (for details on which, keep reading!)
This flow therefore comes with a health warning: It is possible that one day Microsoft will stop this action working completely. Unfortunately, at the moment there is no alternative that doesn’t require use of a Premium Connector, which comes at additional cost to the standard Power Automate licences users generally have. We’ve included this action in order to allow any Power Automate user to be able to run this flow without having to add a new licence.
So, for now, first click the ellipsis then Switch to classic designer.

picture12
The first thing we’re going to do is paste in an Initialise variable action. This is the only action we’ll need to paste in separately, as these actions can’t be included in a Scope (which is a way to group multiple actions together in a way that can be pasted in together).
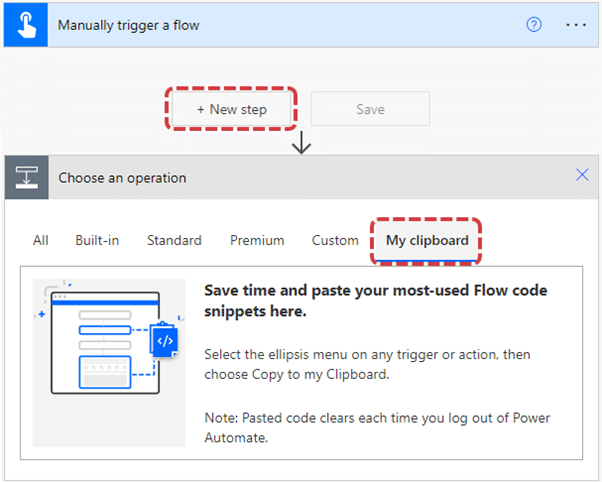
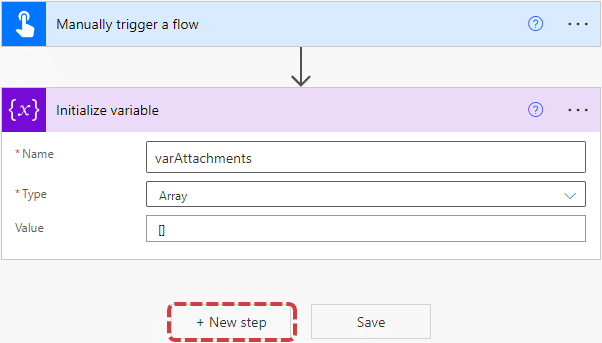
Click + New step then My clipboard. To begin with, you won’t see any actions here to add:
picture13
Copy the following text to your clipboard:
{"id":"5dcfb985-eb80-49cf-a29f-4133ada5d6fc","connectorDisplayName":"Variables","isTrigger":false,"operationName":"Initialize_variable","operationDefinition":{"type":"InitializeVariable","inputs":{"variables":[{"name":"varAttachments","type":"array","value":[]}]},"runAfter":{}}}
Then return to the Power Automate designer and with the My clipboard area still showing, press the paste keyboard shortcut for your device (in Windows this is Ctrl+V). The action will appear – click on it:
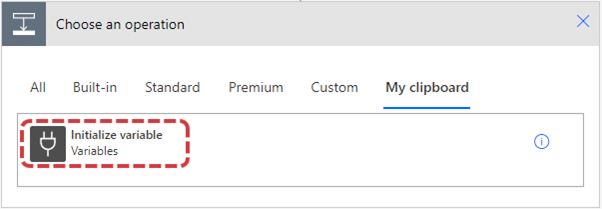
This will add the action to your flow. This action creates a variable called varAttachments which is, to begin with, an empty Array, which is a list of things. An empty array in Power Automate is represented by opening and closing square brackets with nothing in between them. We’re going to store any attachments from our SharePoint list items in this array in a format that we can generate an email from.
Next, click + New Step to add the remaining actions:
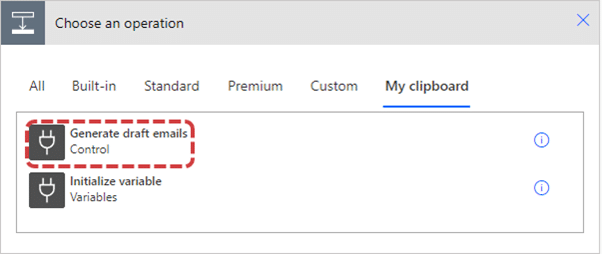
This time the text to copy and paste into the My clipboard section is much longer:
{"id":"6972e25d-519e-42f4-8eae-b01173c1466c","connectorDisplayName":"Control","isTrigger":false,"operationName":"Generate_draft_emails","operationDefinition":{"type":"Scope","actions":{"Get_items":{"type":"OpenApiConnection","inputs":{"host":{"operationId":"GetItems","apiId":"/providers/Microsoft.PowerApps/apis/shared_sharepointonline"},"parameters":{"dataset":"https://yourtenant.sharepoint.com/sites/demo","table":"00000000-0000-0000-0000-000000000000"},"authentication":{"type":"Raw","value":"@json(decodeBase64(triggerOutputs().headers['X-MS-APIM-Tokens']))['$ConnectionKey']"}},"runAfter":{}},"eachItem":{"type":"Foreach","foreach":"@outputs('Get_items')?['body/value']","actions":{"eachAttachment":{"type":"Foreach","foreach":"@body('Get_attachments')","actions":{"Get_attachment_content":{"type":"OpenApiConnection","inputs":{"host":{"operationId":"GetAttachmentContent","apiId":"/providers/Microsoft.PowerApps/apis/shared_sharepointonline"},"parameters":{"dataset":"https://yourtenant.sharepoint.com/sites/demo","table":"00000000-0000-0000-0000-000000000000","itemId":"@items('eachItem')?['ID']","attachmentId":"@items('eachAttachment')?['ID']"},"authentication":{"type":"Raw","value":"@json(decodeBase64(triggerOutputs().headers['X-MS-APIM-Tokens']))['$ConnectionKey']"}},"runAfter":{}},"Append_to_array_variable":{"type":"AppendToArrayVariable","inputs":{"name":"varAttachments","value":{"@@odata.type":"#microsoft.graph.fileAttachment","name":"@{items('eachAttachment')?['DisplayName']}","contentBytes":"@body('Get_attachment_content')?['$content']"}},"runAfter":{"Get_attachment_content":["Succeeded"]}}},"runAfter":{"Get_attachments":["Succeeded"]}},"Set_variable":{"type":"SetVariable","inputs":{"name":"varAttachments","value":[]},"runAfter":{}},"Get_attachments":{"type":"OpenApiConnection","inputs":{"host":{"operationId":"GetItemAttachments","apiId":"/providers/Microsoft.PowerApps/apis/shared_sharepointonline"},"parameters":{"dataset":"https://yourtenant.sharepoint.com/sites/demo","table":"00000000-0000-0000-0000-000000000000","itemId":"@items('eachItem')?['ID']"},"authentication":{"type":"Raw","value":"@json(decodeBase64(triggerOutputs().headers['X-MS-APIM-Tokens']))['$ConnectionKey']"}},"runAfter":{"Set_variable":["Succeeded"]}},"Create_a_draft_email_in_a_mailbox":{"type":"OpenApiConnection","inputs":{"host":{"operationId":"HttpRequest","apiId":"/providers/Microsoft.PowerApps/apis/shared_office365groups"},"parameters":{"Uri":"https://graph.microsoft.com/v1.0/users/[email protected]/messages","Method":"POST","Body":"","ContentType":"application/json"},"authentication":{"type":"Raw","value":"@json(decodeBase64(triggerOutputs().headers['X-MS-APIM-Tokens']))['$ConnectionKey']"}},"runAfter":{"Recipients":["Succeeded"]}},"Recipients":{"type":"Select","inputs":{"from":"@split(items('eachItem')?['Recipients'], uriComponentToString('%0A'))","select":{"emailAddress":{"address":"@{item()}"}}},"runAfter":{"eachAttachment":["Succeeded"]}}},"runAfter":{"Get_items":["Succeeded"]}}},"runAfter":{"Initialize_variable":["Succeeded"]}}}
This will add a scope, called Generate draft emails. Click it to add it to your flow:
At a high level, the scope will look as follows:
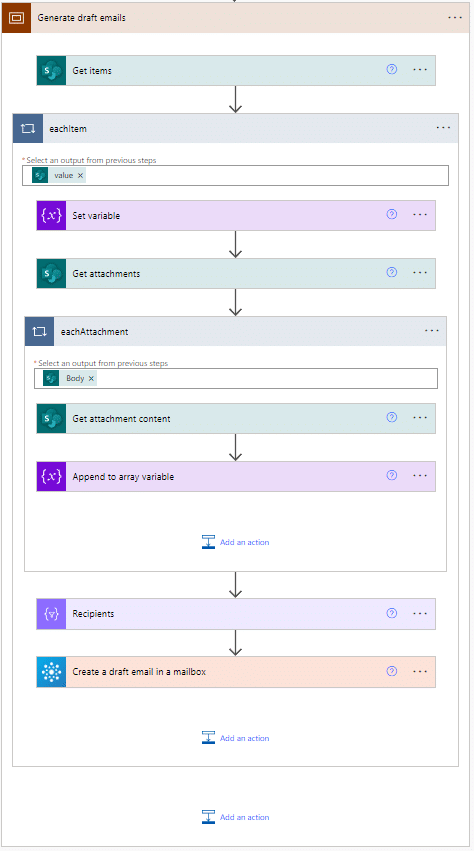
There are a lot of actions here (and many of them won’t work just yet!) but we’ll take each one and get it working and see what it does.
Get the items from the SharePoint list
At the very top, we’re starting by getting all the items from the SharePoint list we created. For each of the SharePoint actions in the pasted scope, you’ll need to update the Site Address and List Name to match your new list.
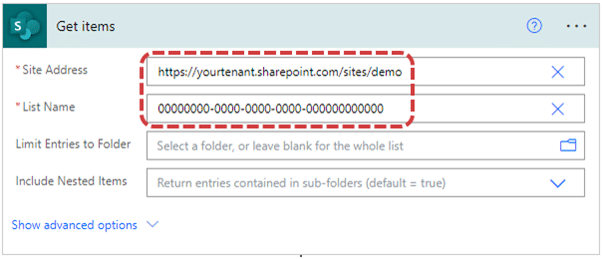
However, if you try to clear out these values straight away and choose another option from the dropdown menu, nothing will appear. That’s because we have to link this action up to a connection before it can read information from SharePoint.
A connection is created when you authenticate the flow to access a data source. In this case, you are authorising Power Automate to connect to SharePoint Online and then read the sites and lists you have access to. This will also allow the action to read the list items when the flow is run.
To add the connection, use the ellipsis in the top-right of the action, then choose an existing connection from the list. If there isn’t one, click +Add new connection to create one:
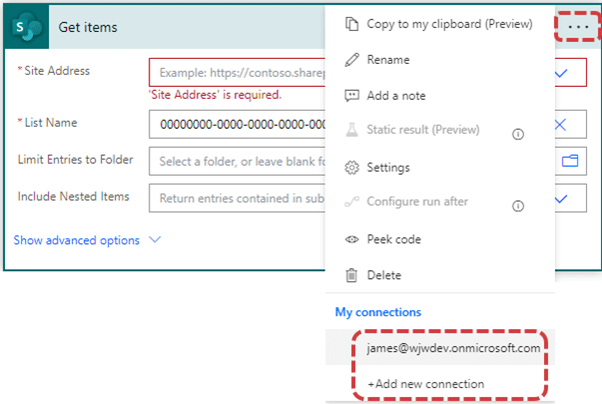
With the action connected to SharePoint, you’ll be able to select your Site Address and List Name:
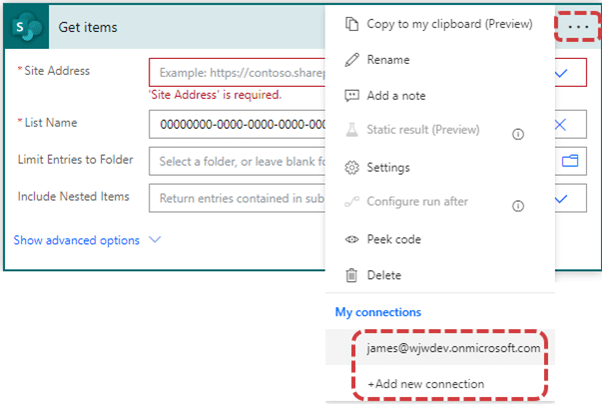
This action will get each row from our list. Make sure you included some sample data there!
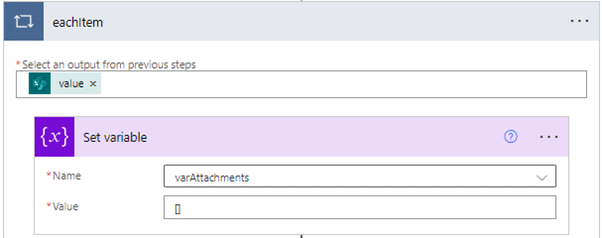
The rest of the flow all takes place with in an Apply to each control loop; the actions in this loop run once for every item in your list, as each item represents an individual email that will be drafted. This is done by using the following expression in the Select an output from previous steps box:
outputs('Get_items')?['body/value']
Attachments
The first action we take in this loop is to clear out the varAttachments array variable, so that we can begin to build it up again from scratch for each email. To do this, we use the square brackets notation again:
Next, we use an action to Get attachments from a SharePoint list item (don’t forget to add your connection and Site Address and List Name values!). The Id for the list item is provided by the following expression:
items('eachItem')?['ID']
Here, items('eachItem') refers to the current list item the loop is running for. ['ID'] gets the ID property of that item, and the ? (question mark) means that if ID isn’t found, a null value (think of it like a blank) will be returned instead of the whole flow failing. Evey list item will have an ID property, so the ? is, strictly speaking, unnecessary here.
Next, another Apply to each control will loop us through the actions to take for each attachment returned from the above action:
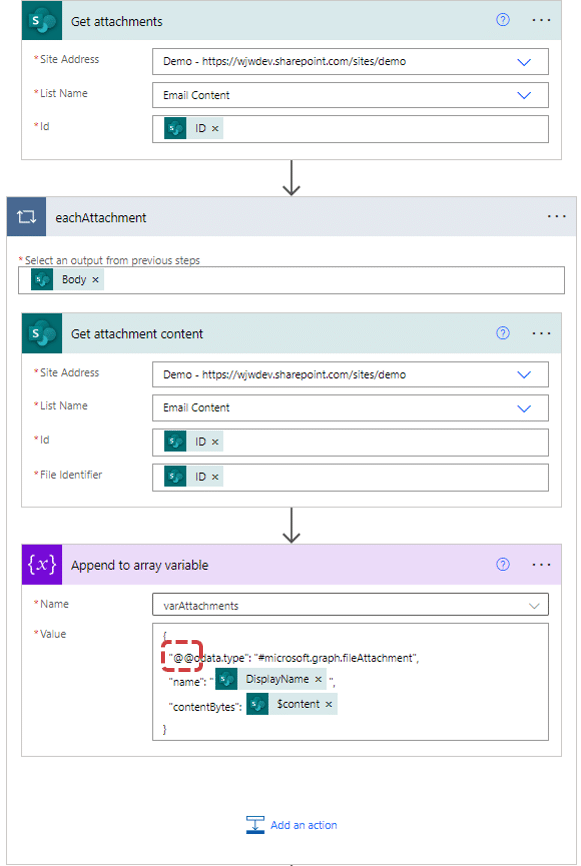
This time, the Select an output from previous steps box contains:
body('Get_attachments')
Now, each time this inner loop runs it will be for a single attachment, which will be represented by the expression items('eachAttachment'). Note the expression depends on the item we want to access – we can still use items('eachItem') to reference the list item from the outer loop, from within the inner loop. That’s a difficult concept to get your head around at first!
We use both expressions in the Get attachment content action shown above. The Id field relates to the list item:
items('eachItem')?['ID']
Whereas the File Identifier field relates to the attachment:
items('eachAttachment')?['ID']
We use the output from this action, and the DisplayName property in the Append to array variable action, to build an object in the format that the draft email request we’ll make later requires.
Please ensure that there are two asperands (the @ signs) in the field! This didn’t paste into the flow properly with the rest of the scope for me, so I had to add this back in manually. This double character technique is known as character escaping, which is a topic for another time.
The two expressions in the object are:
items('eachAttachment')?['DisplayName']
and
body('Get_attachment_content')?['$content']
Recipients
That’s it for the attachments; now we’ll move on to the Recipients column.
The action shown below is a Select action (I’ve renamed it to Recipients):
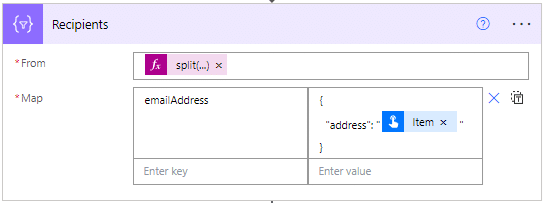
The From field contains the expression:
split(items('eachItem')?['Recipients'], uriComponentToString('%0A'))
This splits the value from the column into an array of email addresses, if there are multiple lines in that column on the list item. This is why we used a multiple lines of text type column for the recipients.
The Map field then creates an object with a single property for each recipient. That property is called emailAddress and it has a single child property called address. The value of address is created using the following expression:
item()
All this complex looking action does is build an array of objects in a particular format, but all they really contain is the email address of each recipient.
Create a draft email using Microsoft Graph
Finally, we’re ready to deal with the action that actually creates the draft email. It’s a call to the Microsoft Graph – but don’t let this concern you; it’s just like any other action in Power Automate in that we just need to know how to fill in its fields.
The requirements (and limitations) for the call are detailed here: https://learn.microsoft.com/en-us/graph/api/user-post-messages?view=graph-rest-1.0
You will see from the page linked above that there are several paths you can use to make this call, but the ones that create emails in the draft folder of a mailbox are:
POST /me/messages
POST /users/{id|userPrincipalName}/messages
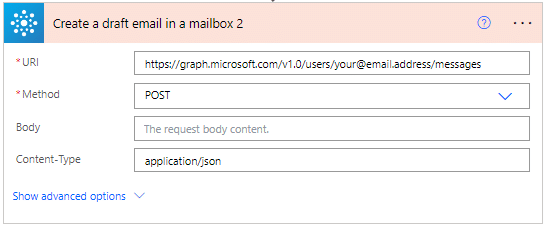
The me version refers to the mailbox of the user that runs the flow. For any other mailbox that the user has access to, including a shared mailbox, we can use the userPrincpipalName version. This is usually just the email address of the mailbox.
First, make sure you add the connection to the action in the same way you did for the SharePoint actions above, then adjust the URI field so that the email address that sits between users/ and /messages is a valid mailbox in your tenant that the user running the flow will have access to:
Lastly, we need to add the Body of the request – this is all the details relating to the email we want to draft. Again, this wasn’t pasting in properly for me so I excluded it from the scope code above. Copy and paste the following into the Body field of the action:
{
"subject": "@{replace(coalesce(items('eachItem')?['Title'],''),'"','\"')}",
"importance": "normal",
"body": {
"contentType": "HTML",
"content": "@{replace(coalesce(items('eachItem')?['MessageBody'],''),'"','\"')}"
},
"toRecipients": @{body('Recipients')},
"Attachments": @{variables('varAttachments')}
}
After pasting, the Body will appear as follows:
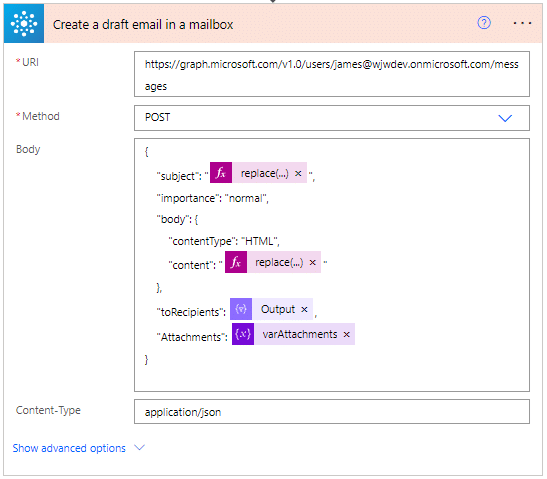
The follows expression is used to generate the email subject:
replace(coalesce(items('eachItem')?['Title'],''),'"','\"')
Remember that items('eachItem') refers to the current list item and ?['Title'] brings back the subject (we renamed this column but that doesn’t change the internal name of the column which is set on creation) or a null value if no subject was entered. We are also using the coalesce function to ensure that a blank string is used if there is no subject, and replace to ensure that no double quotes cause the body to be incorrectly formatted. Again, this is an example of character escaping.
It’s a similar story for the Message Body column:
replace(coalesce(items('eachItem')?[MessageBody],''),'"','\"')
Note that by creating a column in the SharePoint Online modern experience, spaces are removed automatically from the internal name of the column.
The toRecipients (this puts recipients on the To line of an email; ccRecipients would put them on the CC line) and Attachments properties are easy to add here as we already did the hard work getting these arrays into shape in earlier actions:
body('Recipients')
and
variables('varAttachments')
Save and Test
That’s the whole flow done! Click Save at the top of the editor and if the save is successful it means you’ve done everything correctly. If you get any error messages, these usually lead you to the source of the problem, such as a connection not added, or a Site Address or List name not updated.
If you’ve changed the name of any of the actions, double check that any expressions referring to those steps further down in the flow have updated the names automatically; if not you’ll have to do this manually.
All being well, you can then click Test and follow the prompts to run a test of the flow:
You’ll then see the test run of your flow and, after a few seconds (depending on how many items were in your list), you will see the result. Hopefully, this will be a lovely green notification saying “Your flow ran successfully”.
Pop over to the Drafts folder of the mailbox you specified in the Graph action URI field and you should see the draft email(s) sitting there waiting for you!
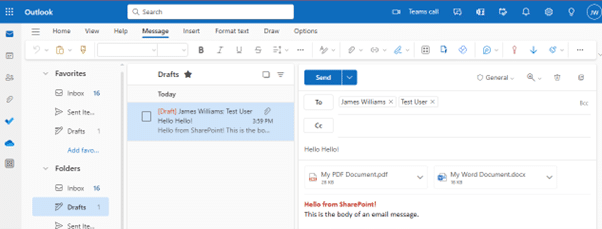
When you’ve checked the email(s) and plucked up the courage to hit that Send button, doing so will send these emails out in the normal fashion.
What will you automate next?
Congratulations! You’ve just created a fantastic automation that will save you a vast amount of time. Time you could spend enhancing and extending the flow – there is a ton of potential here. You could:
- Experiment with different triggers and data sources;
- Build in a process for generating the email text and attachment content dynamically (perhaps using generative AI?);
- Add an approval process to your flow;
- Add images into the email body by encoding in base64;
- Add data formatted as an HTML table into the email body; and
- When you finally trust the process, send the emails automatically!
Drop a comment in the Forum within the Academy to let us know what you create! We’d love to hear from you.
